Showing posts with label recipes. Show all posts

Friday, October 26, 2012

Baking Powder (easy) Biscuits

I love these because they are really good and really easy to do in the morning.  Granted, buttermilk biscuits are spectacular, but I tend not to have buttermilk just hanging around all of the time.  I honestly think the stuff is detestable on its own.  So unless there is a recipe I plan on using it in or I want to soak some chicken or fish for frying, it isn't in the house.  On the other hand, I always have the ingredients for a quick batch of these biscuits and they are really good.

Butter, please


So, here's the recipe:

Baking Powder Biscuits

2 cups of flour
1 Tablespoon Baking Powder
1/2 teaspoon salt
1/4 cup vegetable shortening
3/4 cup milk

1.  Preheat oven to 450F.  Lay parchment paper on a medium to large baking sheet.  In medium to large bowl, add the flour, baking powder and salt and stir to incorporate it some.  Drop in the 1/4 vegetable shortening and use two butter knives to "cut in" the shortening to the flour mixture.  This means using the knives in a scissoring motion, drawing them apart to cut the shortening and let the flour mixture coat the shortening.  Ultimately, the shortening should be pea sized or smaller and well incorporated.  At this point, pour in the milk and use your hands to gently turn the mixture into a dough (nitrile gloves help with clean-up).  It will be a pretty solid, dry dough.  I sometimes have to add another shot of milk to get all of the dry flour mixed in.  A word of caution:  work the dough as little as possible.  The more you work it, the tougher the biscuits will be.

2.  Turn the dough out on a clean, lightly floured surface and press out to about 1/2 inch thick.  Some recipes call for kneading here.  I don't do this and don't recommend it.  You can use a rolling pin if you want, but I find that an unnecessary extra thing to clean.

3.  Use a biscuit cutter to cut out the size you prefer, I like at least a 3 inch diameter one (2 inch will work, too).  Move each dough round to the parchment lined baking sheet.  Press them together for soft-sided biscuits, or apart for crusty sides.  You can press the left over trimmings together and re-cut and then press the last bit of dough into the cutter to use it all, but remember to work it as little as possible.

4.  Put the baking sheet loaded with the pre-biscuits into the oven and bake for 12 - 15 minutes.  I usually set the oven to 12 minutes and check it.  In my oven, 13 is the lucky number..  When the tops start to brown slightly, pull the biscuits out.  In order to make sure the bottoms of the biscuits stay tender, take them off the sheet right away.  If you let them sit on the hot baking sheet, they will continue to cook and the bottoms will be hard and tough.  Brush with melted butter if you're into that kind of thing.

This will make about 8 biscuits cut with a 3 inch cutter at 1/2 inch dough round.

Now, stop reading and go enjoy!

Oh, yes...  best served covered with sausage black pepper cream gravy.  But that's another post.

Thursday, August 16, 2012

Jalapeno Lime Margaritas

I humbly admit, I make a heck of a frozen margarita.  But that's not what this is about.  This is about a cocktail adventure.  That Guy, The Enabler was down this past weekend and we went out with friends and had a great time (sans children).  So, we went to a pretty new cocktail bar in the area and I saw these jalapeno lime margaritas on the menu.  They were incredibly good, but at $6.00 a pop for a short glass, what's the first thing you usually think?  "I can make these."  At least, that's what I usually think.  The list of ingredients for the ones we had were: lime juice, tequila, agave nectar, jalapeno and sugar cane.  The flavor was sweet with a good lime flavor and just a hint of heat at the back of the throat.  They were like crack in a glass.  Well, this is my version, not as sweet because I like a more sour margarita, but if you like - a teaspoon of caster sugar (powdered sugar) or some simple syrup could sweeten it up a bit.  Also, so I don't have to write a novel in the ingredients, use GOOD tequila.  At a minimum, Sauza Gold or something equivalent.  A reposado or anejo are good options.  You don't have to spend a ton of money, but do NOT use Jose Cuervo or your drink will taste like dirt.  This is the secret to being able to crank up the tequila and still have good flavor in your margarita.

Amid the ruins, the prize


Jalapeno Lime Margarita
(Sour Dragon Margarita)

1/2 cup of fresh squeezed lime juice (approx 6 limes)
4 - 5 tablespoons agave nectar
1 part triple sec (I used 1 oz)
3 parts tequila (I used 3 oz of Sauza Anejo Commemorativo)
1/2 jalapeno seeded, chopped then crushed in garlic press
crushed ice
coarse salt (for rim of glass if desired)

If you desire salt on the rim of the glass, cut a slice of lime and run it around the rim, then turn the glass in the salt poured on a plate.  Do this before you put the ice in, please.  Pour all ingredients into a shaker with a strainer and shake well.  Yes, put the crushed jalapeno and its juice in, too.  Strain into glass with ice.  This will make about 4 small glasses (rocks glass size, about 6 ounces each).  This particular recipe yields a bit more of a jalapeno flavor than the ones we had, which I like.  It also yields a pretty strong drink and a couple will make you feel it.  Serve with a lime slice and jalapeno slice.  Enjoy!

Monday, June 18, 2012

Smoke - you complete me

So, there were a few comments requesting the final result of the rub post.  Well, I planned on it but the final results really do need articulation.  There were some issues and then things got weird.  First off, the ribs turned out wonderfully well.  Here is the final product from that project:


Hehe.  Remember these?


Anyways, the pork roast above the ribs was supposed to be pulled pork, remember?  Well, there was a series of unfortunate events.  The internal temperature was rising on pace to make it to the right temperature but we had to go to my parents.  It's a short drive and I had my mom pre-heat her oven and immediately put it in when we got there.  However, that's when it stalled.  I had a heck of a time getting it to get up to 170F.  At this point, I gave up on the pulled pork.  There were two reasons.  I didn't foresee the internal temp making it to the required 200F in time and I started to consider that this was a roast from the rump, not the shoulder.  This means much less fat and these were pretty lean pigs to begin with.  Here's something to remember when you're cooking.  Be flexible.  Adapt and overcome.  Oh, and don't announce your plans (oops on my first post). You might have to change them and then you can't say you did it on purpose.  it's kind of like that perfect shot.  When you make it, just put the gun down and walk away.

What I ended up with was a fantastic smoked pork roast, not a pulled pork sandwich.  The brine made it amazingly moist and juicy.  I sliced it thin and we had it on buns.  I noticed something else strange when we started taste-testing.  I used the exact same rub on both the ribs and roast.  The ribs were great.  Just a hint of heat, a little sweet and perfectly flavored.  The roast was amazing as well, but man was it spicy-hot.  I can only attribute this to the fact that I really packed the rub on the roast.  My thoughts were that when I pulled it apart, the seasoning would incorporate into the meat.  If that actually happened, I think it would have been ok.

All-in-all it was successful.  We had a great Father's Day and good food.


Sunday, June 17, 2012

Aye - There's the pork rub

Well, sometimes you start to brainstorm and simple dinner plans escalate into all-out food insanity.  My mom wanted to have a nice father's day dinner and wanted me to do some grilling, maybe some steaks.  Well, remember, we have all that pork from the pigs we butchered.  (By the way, I have 10 more pounds of bacon curing in the refrigerator).  So, I thought why not some pulled-pork and some ribs?  Ok, so what now?  First, the pork we have is a roast from the ham, not the shoulder.  The shoulders all went into sausage.  That means I need to do a good brine and rub for that.  Might as well make a rub for both the ribs and roast, right?  Well, here is what I have done so far:

First off, this recipe is for a bone-in pork shoulder and I recommend that for the fat content.  This will work for a roast up to about 6 - 8 pounds.

Aye, the rub:

1 Tbsp onion powder
1 Tbsp garlic powder
1 Tbsp kosher salt
1 Tbsp cayenne pepper
1 Tbsp ground cumin
1 Tbsp paprika
1 Tbsp fresh ground black pepper
1 Tbsp chili powder
1/2 cup brown sugar

I put all of that into a dish with a tight lid, then shake vigorously.  Remove the lid and crush the larger chunks of brown sugar and shake again.

The brine:

2 quarts of cold water
1/2 cup kosher salt
1/2 cup brown sugar
1 bay leaves
3 Tbsp of rub

Pour cold water into bowl, preferably with a spout to pour back out easily.  Add the salt and stir until dissolved.  Add the sugar and stir until dissolved.  Add the rest and stir.  Put the pork roast into a 2 gallon Ziploc bag and pour in brine.  Seal top and put in refrigerator for at least 8 hours.

After brine is complete, pour out and rinse and pat roast.  I put mine in a disposable aluminum pan since I was planning on smoking it.  I wanted to retain as much moisture as possible, and not lose any dripping down through the grate.  Cover the roast liberally with the rub and put on the smoker.  You can use the oven in all honesty, but you'll miss out on the smoke flavor.  Whichever means you decide upon.  Keep the temperature at around 225F and you'll want to cook it for 1.5 to 2 hours per pound.  The internal temperature should reach 200F.  Then, shut off the oven and let the roast slowly cool in the oven until it reaches 170F.  Take it out and use two forks to pull it apart.  This should be very easy at this point.

Yum
So, for right now it just went on the smoke.  I used the rub to coat the ribs as well and I'm cooking them side by side.


Can't wait for dinner.

Sunday, June 10, 2012

Fries

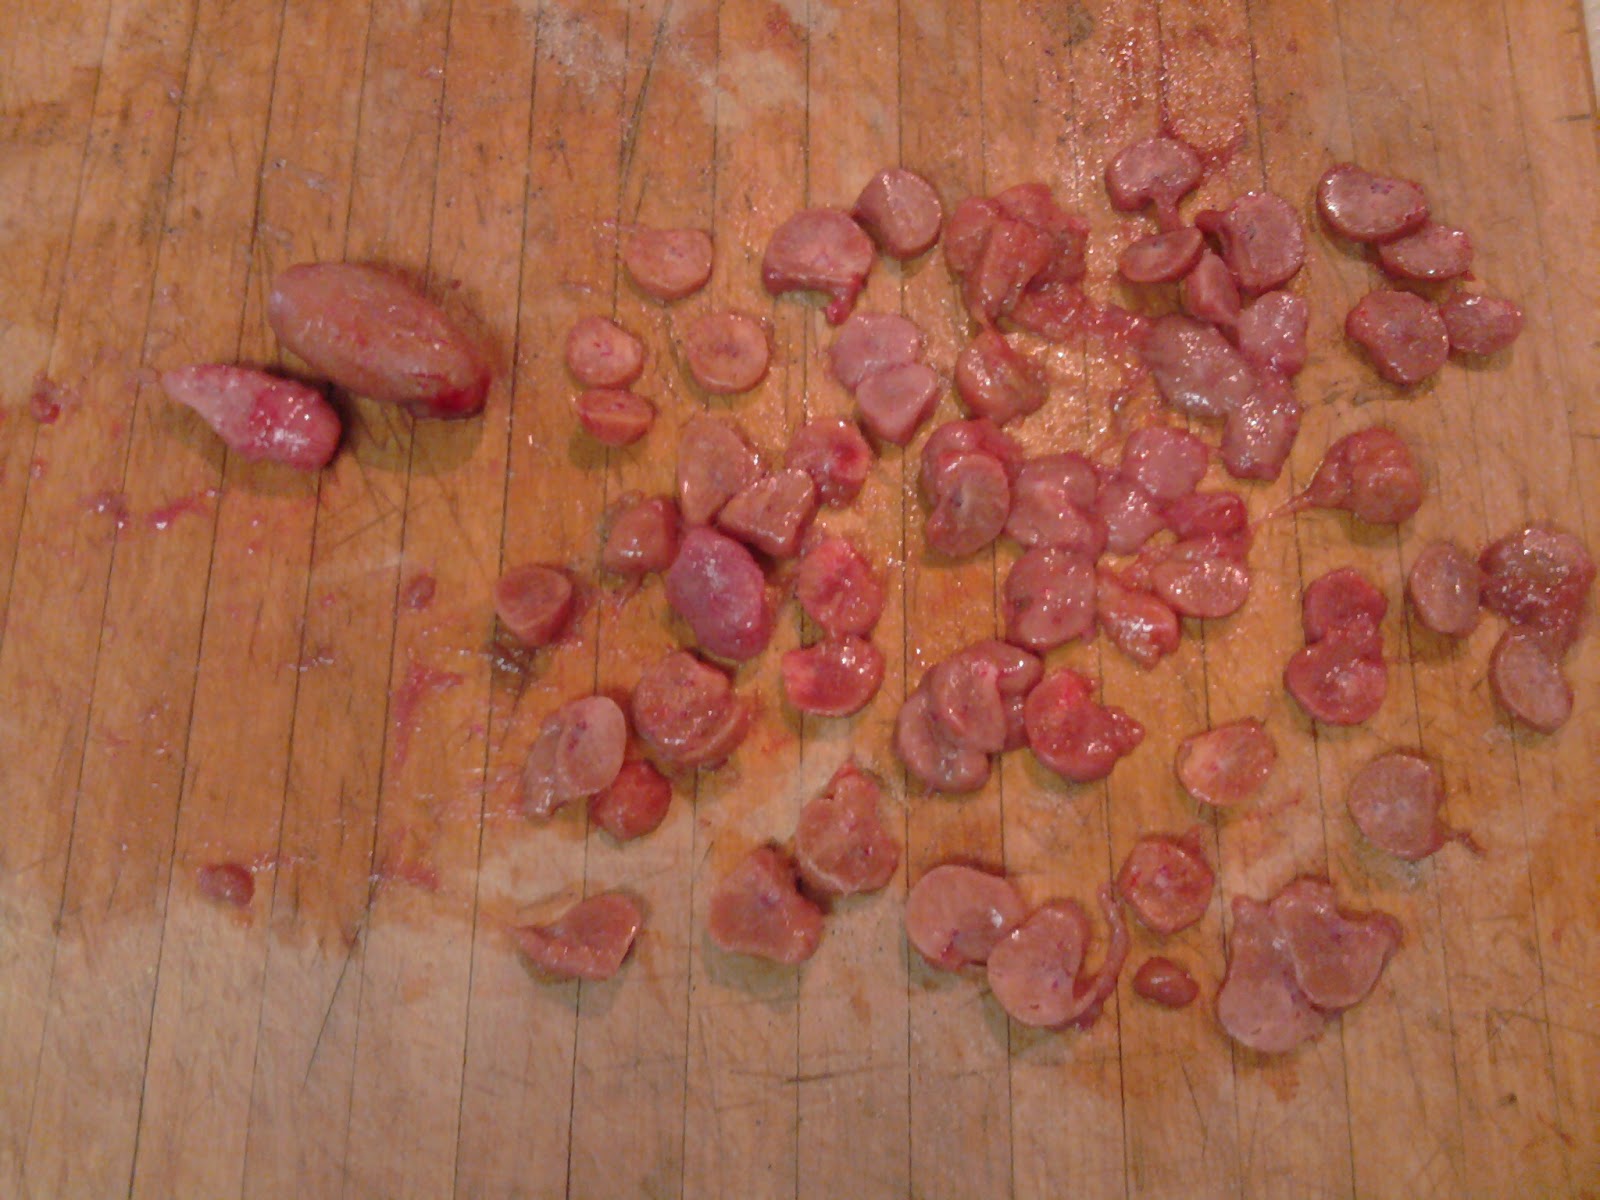
But do you know what kind of fries?   My uncle is here from West Texas.  They do a lot of ranching.  Along with that comes such delicacies as "fries."

Frozen
Have you figured it out yet?

Yep, what are called calf fries, or mountain oysters among other things.  A lot of people just can't deal with the thought, but on the ranch these are something to look forward to around cutting time.


There are just too many jokes to make and none of them have any tact.  The process is pretty simple.  The cutting is obviously already done.  Then, you peel, slice and season.  A little salt, pepper and garlic powder then...


into the cornmeal.  Turn the heat on under some oil and get it up to around 350F.  Drop these in and fry until just golden.


Done.  Serve with french fries.

I'm curious about the responses I will be getting for this one.  I know everyone has heard of these.  I figured few people have ever seen the process, so I'm here to appease your curiosity.

Monday, May 28, 2012

Meat Miscellany

So, first of all...


The bacon is done!  Well, most of it was done before, but the pieces I wanted to smoke were done yesterday. I didn't have a "bacon hanger" (yes, there is such a thing) nor the desire to get one.  So, I used what we had.  Since we make a lot of sausage, we have a lot of twine.  So, here you go...

Hey, how's it hangin?
The pepper cure is in front and brown sugar in back.  I didn't want a lot of heat under it, so I started a separate fire and put the coals in a pan.  Those were topped with wet wood chips and sawdust.  The wood chips were a mixture of oak and mesquite.  There was also a little pecan in there since that was part of the coals from the fire.  After 2 1/2 hours of waiting...

Beer:  Shortening wait times since 5,000 B.C.
this is the result:


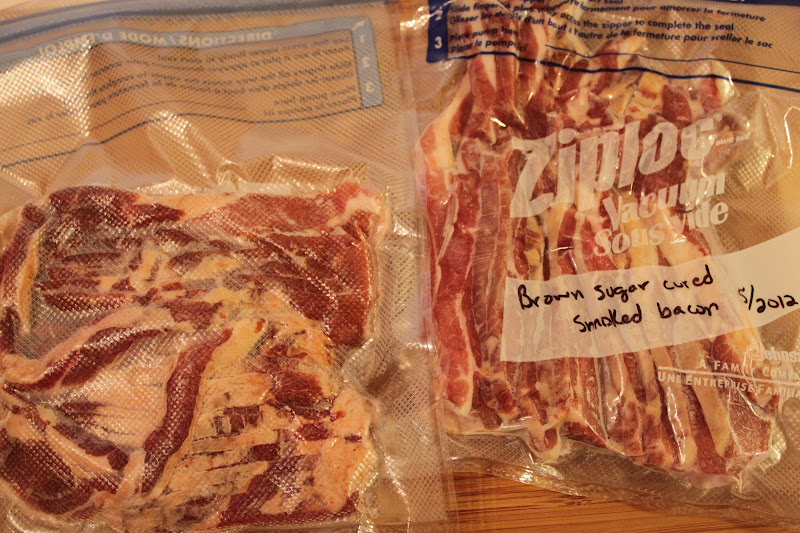
I know it doesn't look much different, but you can just see the color change.  It took on a perfect amount of smoke.  One of the suggestions which I'm glad I paid attention to, was to make sure the surface of the meat is completely dry.  I let it sit, uncovered, in the refrigerator to ensure dryness and it paid off.  The droplets of water collect smoke particles and can cause almost a bitter, smudgy surface.  So, after this I cut it all into nice thick, uniform pieces and vacuum packed them in Ziploc bags.  FYI, if you want a good tip put a few boxes (or more) of Ziploc vacuum bags and a hand pump in your "go" kit.  The possibilities are endless and no batteries or electricity required.  I did a little test before packaging and must say the smoke was the perfect final touch.  Of course, now I wish I would have smoked all of it.


And now, on to more curing.  I mentioned the peameal bacon and it started tonight.


I cleaned up two large back loins (back-straps for you hunters) today and cut the center section of each out for this project.  I'm excited about this because I fell in love with it while visiting Canada and you can't get it down here.  I'm sure this is the item from which the misnomer "Canadian Bacon" was coined.  So, this is step one, curing for 5 days.  More to come.

P.S. I chose the title so kymber would not try to avoid the post.  :)

Friday, May 25, 2012

Bippity Boppity BACON

To start off, I will show you an amazing piece of discussion regarding bacon.  It's everything I believe on the subject:


Heh.  Of course, you know I ripped the title of the post straight from the video.  Now, on to the meat of the matter.  The curing is complete and...

Table for Yum, please
So far, so good.  The color is right.  So, after taking it out of the fridge, I thoroughly rinsed and then soaked each slab in cold water for 30 minutes.  After draining and drying with paper towels, we're ready to do some testing.  At this point I was a bit concerned that maybe I let it cure for a bit long and it might be too salty.  Turns out that was all just nonsense.

Oh, yes!  Yes!  Yes!
Top left - chipotle; top right - brown sugar; bottom - black pepper.

Also, this is where I give HUGE kudos to Old NFO for mentioning black pepper curing.  This was oh so fantastic and was my favorite.  It had a wonderful black pepper flavor throughout the whole piece of bacon.  Mrs. 45er preferred the brown sugar cure.  It had a nice sweet/salty flavor going on.  The chipotle was very nice, but I'm afraid I didn't give it much of a chance.  It had a nice cure and wasn't overpowering in flavor, but had just a nice hint of heat in the back of the throat.  Unfortunately, I used the worst cut of meat for that cure since I thought it might not be that great.  Turns out it was just fine.  Oh well, we'll have more soon.

Results?  Well, after the few test batches...  need more BACON.


So I slice a bunch more of the black pepper cured stuff and filled up the pan.  I was discovering now that this stuff is rather lean and you don't get much fat in the pan.  I started with a touch of olive oil in the pan until some of the fat rendered out.  Normally, I would add bacon fat to start things off but I didn't want to alter the flavor with commercial bacon fat.  Also, it was hard to cut it real thin but I did ok.  I started the heat medium low until the meat was close to cooked and rendered some fat, then cranked it up just over medium to put the crisp on it.

Cue angels singing
Just some observations:  What we have come to know as "bacon" has its own distinct flavor and smell.  It is  truly a great thing, but the commercial bacon has a different smell and flavor.  It's a funny thing, what you become used to becomes your point of reference.  It's like eating canned green beans all of your life, then trying fresh ones.  You may not think you like it, but not because it isn't better only because you aren't used to it.  This is kind of like that.  However, I don't know how you couldn't think this was good in a different way.  We loved it.

So now the meat is ready for some smoke.  I cut the slab of pepper cure in half to keep some normal and smoke some.  Same with the brown sugar.  We will see how that turns out after tomorrow.  I'm so happy with the results, I can't wait to do some more curing.  Next up, cured back loin (peameal bacon).

Monday, May 21, 2012

Makin' Bacon

This starts a new label on the blog called "charcuterie."  That is, essentially the smoking and curing of meats.  We will be making venison sausage soon, as we do every year and I've been trying to expand what we can do with what we have access to, which I must say is a lot and we are blessed for it.

Well, not having a ton of time to get this going, I asked Mrs. 45er to get some straight curing salt when she did the groceries.  All they had was this:


It is a pre-mixed cure, so my ability to play around was limited.  I want to try the High Mountain stuff that dakota mentioned because I've heard good things, but I would have to order that and wait.  The good news is that we have 2 more pigs to go, so there will be plenty of bellies.  I did a quick look on-line and saw some recipes that gave me a basic idea of how to use the product and decided to play anyways.  It's just in my nature.  So, the basic recipe seemed to be about one oz per pound of meat.  I started with that as a base and added other things.  For the nice, big cut I decided to take NFO's advice.  I do love pepper...

Pepperific
So, this one is going into the bag just like this.  It is essentially:

1 oz/pound of Morton's Quick Cure (2/3 on the meat side, 1/3 on the fat side)
1 cup cracked black pepper

Most of the recommendations for bags to use are 2 gallon Ziploc bags.  I'm going to get some of those for trying smaller sections, but for a monster like this I used some brining bags I got from Sur la Table.  These worked wonderfully.  I got them to brine the turkey for Thanksgiving (a must, trust me) but I will get more before then.

Goodness in a bag
So, I zipped it up, folded it over and put it in the beer fridge.  Yes, you heard me.

Now, on to the other experiments.


Yes, that is a beer from the fridge.  I had to make room for the bacon.  :)  The Old Rasputin Russian Imperial Stout  goes well with bacon makin'.  

On the bottom, I added some brown sugar to the cure, so:

1 oz/pound of meat of Tender Quick Cure and
1 Tbsp of dark brown sugar

On the top, well that is going to be chipotle bacon.  I'm real interested to see out this one turns out.

1 oz/pound of meat of Tender Quick Cure and
1/2 Tbsp of ground chipotle chile pepper

And this is the ground chipotle I used:

Yum in a bottle
So now, we are at the "we shall see" stage.  I have learned a few things since this process started about harvesting the belly from the pig and what is considered "belly."  Pork belly being belly is about as much a misnomer as the pork butt is from the butt.  Also, these pigs were fabulously built but rather lean so you don't see the classic 3 to 4-inch-thick pork belly. I'm not too worried.  There is plenty and if this turns out, we'll be rolling in bacon, which is kind of a fantasy of mine.  ;)

Sunday, May 6, 2012

Honey Whiskey Bacon Walnut Brownies, insanely inspirational

So, back when I first started blogging, I posted about some whiskey brownies.  Now, these were pretty darn spectacular.  However, this last weekend That Guy and family were in town and Mrs. 45er and I brought over some bacon brownies from a local restaurant.  They were inspiring and I wondered how I could make it even better.  Then I remembered these brownies.  Thoughts started hatching and now we have this to deal with at the house:

The final product and...

the final result


So, from the original link you have the recipe.  A little twist was added by using Bushmill's Irish Honey Whiskey.  Now, the big addition is properly cooked bacon.  Slowly cooked until it is nice and crispy so you can crumble it up.  As far as the amount of bacon to use for the recipe, I would say as much as you can get away with.  It is also best to keep the cooked bacon separate until ready to serve.  If you top the whole thing, the moisture from the brownies may make the bacon soggy and/or chewy.  Mrs. 45er and I just had to try a test piece and I can tell you that you have to try and make this.

Even if you don't go this crazy with the brownies, you should try the brownie recipe.  These are a really simple, scratch-made brownie that I was pretty happy with.  However, the whiskey sure does soak in and soften up those harder edges of the brownie.

Enjoy.

Monday, December 26, 2011

High Caliber Pancakes

I wasn't much in the mood to do a recipe post today, but Mrs. 45er gave me a cute pancake tracer to make fun shapes, letters and numbers for the kids.  Of course, it took a turn and I thought it would be a fun post.  Why not throw in the recipe for the good old fashioned pancakes while I'm at it?

Chernobyl Zoo
It started with requested animals.  That's a lion and giraffe in case you couldn't tell.  I guess not a bad attempt for a first time.  So, the kids got theirs and I had some time to play with extra batter.

But, of course
Lesson learned, do the shape backwards and the nice looking side will be up for viewing.

Just so we don't have to have that debate
I had to hurry on these because the kids were almost finished eating.  This means everything stops again.  I just had to do 9mm so we didn't have to argue about whether or not the 9mm pancake was filling enough to stop you from eating vs just one .45 pancake or if you needed more 9mm pancakes.

So, now for the recipe.  This is an easy one and I highly recommend it over the box mix.  It's especially nice to have around in case you are used to using instant but just don't have any.  You'll find it isn't that much harder to do and has pretty much the same ingredients.

High Caliber Pancakes


1 cup all purpose flour
2 tablespoons sugar
2 1/2 teaspoons baking powder
1/2 teaspoon salt
1 1/4 cup milk
3 tablespoons butter or margarine (melted)
1 large egg

Large Bowl
Large Whisk or fork for mixing

The key to light, fluffy pancakes that are not too tough is to mix the batter as little as possible after wet and dry ingredients are mixed.  Stirring works the gluten in the flour and toughens the pancakes.  This is why restaurants that make large batches and have to keep stirring them end up serving tough pancakes.

Pour flour, baking powder, salt and sugar into large bowl.  Use whisk or fork to incorporate ingredients together before mixing in wet ingredients.  Melting butter in the microwave is very fast.  3 Tbsp melts in about 20 seconds in a small bowl.  Swirl if there are small pieces that haven't melted.  For wet ingredients, I recommend starting with at least a 2 cup measuring cup.  Pour in milk, crack the egg into a separate bowl to make sure it is good and there are no shell pieces.  Put egg into measuring cup with milk.  Use whisk or fork to premix these ingredients and break up the egg (less stirring of the batter).  Pour the milk/egg mixture and melted butter into the bowl at the same time.  Use the large whisk to incorporate the ingredients (a spoon is ok for this process, I find the whisk incorporates the ingredients quicker for less stirring).  All you are looking for is that the dry ingredients are mixed in and there are no huge clumps.  This will be only 7 or 8 stirs.  The batter will be lumpy and that's ok.  Do not keep mixing.  Let the batter rest for a couple of minutes before cooking.

Set flat top griddle (recommended ) at about 275 - 300 F.  A pan is obviously fine for this (medium heat), but makes cooking slow since fewer can be done at the same time.  Some recipes call for brushing oil or butter on your cooking surface.  I'm not a fan of this if you have good non-stick cookware.  The butter/oil just causes the first couple of pancakes to look funny.  Pour batter using ladle or cup with a spout into 3 - 4 inch rounds.  Cook a minute or two on the first side (until bubbles start to form and the edges are dry).  When edges are dry and underside is golden brown, flip pancake.  Cook until other side is golden brown.  Butter them up and pour on your favorite syrup.  Enjoy!

Recommended pairings - BACON.

Tuesday, November 29, 2011

Beef Slab and Bloody Caesars

So my parents got their meat back from the steer that was sent to the processor.  I know how lucky I am.  Forget the grass-fed, no hormones, blah blah blah in the supermarket.  This is pure, free-range stuff.  The way cattle were supposed to be raised.

Flintstones, table for two
I mean, that's a sirloin.  If there's one thing I know, it's that I'm spoiled.  Not only great, free-range beef fed by my dad, but look at the size of that thing!  The Shiner was just for perspective.  Well, ok, it was for perspective at first.  So, that was consumed during the grilling process.  What else are you supposed to do with it?

It's seeeaarrrific!

So, what really goes with a great steak?  Well, lots of things.  But, in particular I've grown particularly fond of a drink that a restaurant called The Keg (located in Canada) serves with their steaks.  It's the Bloody Caesar.

Yummy
So, just for kicks, here's my recreation of their recipe:

The Bloody Caesar

Good Vodka (I use Dripping Springs Vodka)
Worcestershire Sauce
Tobasco
Clamato Juice (stay with me, here)
Celery Salt
Fresh Ground Pepper
Crushed Ice

So, here's the fun part.  There isn't a "recipe".  It's really to taste, so I'll just give guidelines.  You can rim the glass with a lime and celery salt if you like.  I usually don't.  I just add the celery salt into the drink at the end, but you can also do both which I will do for parties when presentation kind of counts.

Fill the glass with crushed ice (regular ice is ok, too).  For the liquid ingredients, put the vodka in first.  This gives you the ability to regulate the amount of alcohol.  Next, add the Worcestershire sauce.  I put around a couple of teaspoons and sometimes up to a tablespoon depending on the mood I'm in.  I really don't measure, so I'm guessing here.  Follow that with a couple of dashes of Tobasco, then top up with Clamato Juice.  I really do NOT like Clamato all that much, but it really is great in this drink.  Add a few dashes of celery salt and a few grinds of fresh ground pepper.  Stir well and enjoy with a great rare (or medium-rare) steak.  Cheers!


Monday, August 15, 2011

Lemon Vinaigrette

You know how mistakes have given us some of the best things on earth?  Well, this was kinda like that.  I'm not at all comparing this dressing to penicillin (because it tastes way better).  It was funny the way it came about and I'm really happy with how it turned out.  I was in the mood for some homemade pizza and got a recipe from That Guy at Rock in a Sea of Chaos for one of his wife's pizzas.  Don't go there for the pizza recipe, it's not there either.  Good news!  That Guy posted the recipe for the Pizza de Parma.  Lucky you.  Oh, was it ever fantastic, but this isn't about the pizza (for now).  The recipe called for a drizzle of lemon vinaigrette.  Well, the local store didn't have any.  At all.  We did, however, end up with a lemon olive vinaigrette which I like but was no good for the pizza recipe (and my wife despises olives).  There is a significant difference between olives and olive oil.  Just FYI, but I'm sure you knew that.  Anyway, I just HAD to have this pizza, so I decided I'd try to make the dressing on my own.  It turned out so good I've made and gone through three batches already.  On top of that, it was EASY.  Here it goes, you won't be disappointed.  I used a shallot and a clove of garlic because when I did the test recipe 2 cloves was just too much garlic for me.  If you don't have a shallot you can exclude that, but I'd caution against 2 cloves of garlic.

Lemon Vinaigrette

1/2 cup extra virgin olive oil (use good stuff for this, it makes a difference)
4 tablespoons freshly sqeezed lemon juice (yes, FRESH)*
1 teaspoon dijon mustard
1 1/2 teaspoon fresh thyme (stripped from stem and finely minced)**
1 clove garlic (minced or I prefer using a garlic press)
1 medium shallot (minced or pushed through garlic press)***
1 1/2 teaspoon coarse salt (I love Kosher salt)
fresh ground pepper (to taste, a couple of pinches at minimum)

*1 lemon = about 1 tablespoon juice
** thyme can be optional, but it is really good
*** no shallots?  be careful using more garlic.  I'd use a couple tablespoons of sweet yellow onion first.

I mix everything together in a 2 cup or larger measuring cup (olive oil first to measure correctly).  Whisk it together or just pour it into your dressing bottle and shake it up.  Keep refrigerated.  Serve at room temperature and shake well before drizzling on salad (or pizza if I'm allowed to give the recipe).

Yields about 1/2 cup of dressing.

Enjoy!

Tuesday, July 26, 2011

Citrus Iced Tea

This turned out just awesome.  I highly recommend it.  It's perfect on a hot summer day.


What you need:

2 Clementine Tangerines (or a medium orange)
1 Lime
microplaner for zesting
Loose tea for making iced tea
teaball
water
strainer

Boil about 1/2 gallon of water.  Here's a tip/trick:  Using filtered or bottled water for the brewing portion will yield much clearer tea.  You tend to get cloudier tea if you use high mineral content tap water.

While the water is coming to a boil, fill the tea ball with your loose leaf tea.  While you CAN use tea in bags, you will taste the paper and the tea loses flavor sitting in packages for months.

Zest the mandarins and the lime completely and put the zest in the bottom of a heat-safe bowl.

Pour boiling water into bowl and put teaball with tea into water.

Let the tea steep for at least 5 minutes (or per directions on tea).

Strain tea and chill.  Serve over ice.

For a little fun, peel the tangerines and lime and freeze them solid, then cut them into wedges and serve them as ice cubes in the tea.

This turned out so well, I had to make another pitcher the same day.

Wednesday, July 13, 2011

Bad Milk Pancakes

Or, as they are usually called, "Buttermilk Pancakes".  My grandmother and mother drink the stuff *gag*.  I find it fantastic for cooking and soaking chicken for frying and that's just about as much as I can stand it. 

These are pretty darn good pancakes.  I have been using this recipe for special occasion breakfasts for a while now.  I really dig them for the right time (or any time).  I have a regular pancake recipe that I'll post in the future, but these are just too good to pass up.

Prep: About 15 - 20 minutes
Cook:  About 4 minutes per batch

Some hints:  Get a reasonable electric griddle if you can.  I got one on sale for about $30 and it has been a great purchase.  Pans are rough for cooking pancakes unless they are more like a flat griddle.  If you're fortunate enough to have a griddle for your stove-top, even better.  Also, a nice wide spatula for flipping pancakes.  If you don't make the pancakes crazy big it's not a disaster with a normal one, but a good spatula makes all the difference in the world.


Mmmmmmmmmmmm, butter


The stuff:

1 cup all-purpose flour
2 tablespoons sugar
2 teaspoons baking powder
1/2 teaspoon baking soda
1/2 teaspoon salt
1 1/4 cups buttermilk, or 1 cup plain yogurt plus 1/4 cup milk
3 tablespoons butter or margarine, melted (use butter)
1 large egg, lightly beaten
vegetable oil or butter for brushing pan or griddle

In a large bowl, combine flour, sugar, baking powder, baking soda, and salt.  Use whisk to quickly blend dry ingredients.  I also usually break the egg into the buttermilk in the measuring cup and whisk it together.  It saves dirty dishes and makes mom happy.  You want to stir the batter as little as possible to avoid tough pancakes, thus the pre-beating of the egg.   Add buttermilk, melted butter, and egg.  Stir with whisk until flour is moistened.

Do not freak about lumps, just make sure there is not visible dry ingredients and it is pretty well incorporated.  Let the batter stand for a few minutes while griddle/pan is heating.


Soooooo close

Heat griddle or 12-inch skillet over medium heat until drop of water sizzles; brush lightly with oil (or butter, I've also found this to be optional if you have a good non-stick surface).  Pour batter by scant 1/4 cups onto hot griddle (a ladle helps here), making a few pancakes at a time.  Cook until tops are bubbly, some bubbles burst, and edges look dry.  With wide spatula, turn and cook until underside is golden.  Transfer to platter; keep warm.  Pancakes can be "held" in oven on lowest setting with towel covering pancakes.

Repeat with remaining batter, brushing griddle with more oil/butter if necessary.

Makes 3 servings.

Slather with butter and drizzle with favorite pancake eatin' juice (syrup).  Bacon is, of course, generally required with pancakes.

Friday, June 10, 2011

Brownies with.. wait, what???


So, there are a few types of barrels and smoke I like.  Wood barrels tend to produce something else I'm fond of.  I'm trying a new recipe for the guys coming down this weekend.  After a hard day of training at the range, it's time to sit down to a nice meal and then a nice dessert of...  Whiskey Brownies?  Heck, yes.  Let's hope it's as awesome as the concept.

Edit:  Success!  The recipe calls for 1/2 cup of whiskey.  it seemed like a lot, but with a relatively good quality liquor it really complements the chocolate well.

Recipe:

Brownies

3/4 Cup Flour
1/2 tsp baking soda
1/2 tsp salt
1/2 cup sugar
1/3 cup shortening
2 tbs water
2 eggs
1 (6 oz) package semi-sweet chocolate chips
1 tsp vanilla
1/2 cup whiskey
1/2 cup nuts (optional)

Chocolate topping:

1/2 cup heavy cream
1 package (6oz) semi-sweet chocolate chips

Pre-heat the oven to 350F and grease a 9 x 9 inch pan.  I used an 8 x 8 and it worked great.  Sift together flour, baking soda, and salt in a bowl and set aside.  In a saucepan combine sugar, shortening and water.  Cook on low heat until boiling gently.  Stir in chocolate chips and vanilla.  Here, the recipe calls for beating in the eggs one at a time.  That makes me nervous.  I always recommend tempering eggs before adding them to something hot, otherwise you get scrambled egg bits.  So, add some of the hot mixture to a slightly beaten egg while whisking and add that back to the pan.  Repeat for the other egg.  Add flour mixture and stir well.  At this time  you can add the nuts if you choose to do so and stir.

Pour mixture into pan and bake for 30 minutes.

After brownies have cooled, sprinkle the whiskey on top and let it soak in.  If you aren't serving them right away, I recommend to wait on this step (and the topping) until about an hour or two before serving).

To make the topping, heat the cream in the microwave for 45 seconds.  Pour hot cream on top of chocolate chips and stir.  If the chocolate does not melt, put mixture into microwave for 10 seconds at a time until smooth and spread on top of brownies.  Allow to cool for soft topping or put in refrigerator if you prefer the topping to be more firm.

http://www.drinkoftheweek.com/blog/whiskey-brownies/